
RECIPE: Raclette Pizza
By Modernist Pizza by Nathan Myhrvold and Francisco Migoya, published by The Cooking Lab
Features Business and Operations In the Kitchen Recipes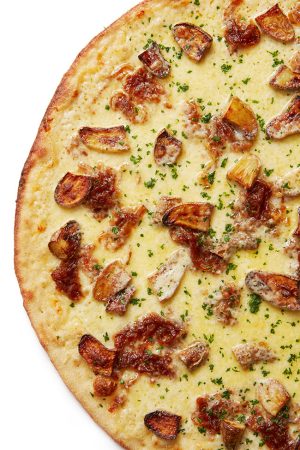 photo: The Cooking Lab, LLC
 This pizza is topped with crème fraîche, roasted fingerling potato, raclette cheese, browned onion and parsley.
Raclette is the name of a type of cheese as well as a preparation in which the exposed surface of the raclette cheese is heated with an infrared broiler. This melts and somewhat browns the surface of the cheese, and then it is typically scraped onto boiled potatoes or bread. It makes complete sense to us to translate this into pizza form.
Makes one 13-inch pizza | Total Time: Active 6-8 minutes / Inactive 37 minutes
INGREDIENTS
- One ball of Direct Thin-Crust Pizza Dough (see recipe below)
- 3/4 cup crème fraîche
- 3-3/4 cups raclette cheese, coarsely grated
- 1-1/2 cups fingerling potatoes, halved, thinly sliced and roasted
- 1/3 cup + 2 tbsp browned onions (see instructions below)
- 1 tbsp fresh flat-leaf parsley, finely chopped
Substitutions
instead of crème fraîche, you can use sour cream, mascarpone or Greek yogurt.|
Try caramelized shallots instead of caramelized onions.
Any variety of Swiss-style cheese, such as Emmental or Gruyere, will work in place of the raclette.
INSTRUCTIONS
- Preheat the oven to 550 F for at least 30 minutes with a baking steel or baking stone in the top third of the oven.
- Place the dough ball on a well-floured surface. Dust the top generously with semolina flour.
- Place the rolling pin on the centre of the ball and press down.
- Rock it back and forth until it is an oval with an even thickness. Rolling the dough very thin isn’t as important as making sure it has a uniform thickness.
- Rotate the oval 90 degrees and rock the rolling pin back and forth until you have a circle (flour the surface as needed).
- Rotate the dough 90 degrees again and roll the rolling pin over the dough until it is oval again.
- Repeat steps 6 and 7 until the dough is round and 0.08-0.12 inches thick. The disc should be about 13 inches in diameter.
- Dock the dough up to the edge using a dough docker, a fork or the tip of a knife to make holes in the dough.
- Use an offset spatula, sauce spoon, or concave silicone spatula to spread the crème fraîche evenly over the dough, leaving a 1/2-inch border.
- Distribute the cheese evenly over the sauce.
- Distribute the potatoes and onions evenly over the cheese.
- Slide the dough onto a peel or slide the peel at about a 5-degree angle under the dough, using quick, jerking back-and-forth motions, until it is completely on the peel.
- Load onto the baking steel or baking stone in the oven with a quick pull-away motion.
- Bake for 6-7 minutes, rotating 180 degrees halfway through baking.
- Check the doneness of the bottom of the pizza.
- Remove the pizza and place on a serving tray.
- Sprinkle the parsley over the pizza.
- Cut into 6-8 triangles.
Notes
You can use fine semolina for flouring your worktable during shaping, but coarse cornmeal is also commonly used.
To roast the potatoes, toss the sliced potatoes with olive oil to coat completely and season if desired. Place the vegetable on a sheet pan (non-stick or lined with aluminum foil) in a single layer. Do not overcrowd or they will steam rather than roast. Roast the potatoes in a 350 F oven until they are cooked through. Remove the pan from the oven and let cool to room temperature before using them to top the pizza.
These topping amounts are for one 13-inch pizza. You will have enough dough to make five pizzas, so you can multiply these ingredient amounts to accommodate however many pizzas you are making.
The dough doesn’t have to be a perfect circle on your first few tries; this will take practice to get right. You can also manually pull and stretch the dough to form an evenly shaped circle once you have reached the desired thickness.
Alternatively, the sauce and cheese can be spread to cover the entire dough disc without leaving room for any exposed dough crust rim. We like having a handle on this pizza, though, so we prefer to leave a rim.
If you don’t have a peel, you can use parchment paper to make it easier to load your pizza into the oven. Cut your parchment paper slightly larger than your pizza. For a 13-inch pizza, cut a 14-inch round or square piece. Shape your dough and place it on the parchment paper. Apply sauce, cheese and toppings. Transfer the pizza onto the back of an upside-down sheet pan or cookie sheet and slide the pizza into the oven.
Some home ovens will not reach 550 F (in some cases 525 F is the highest they will get). If this is the case, increase the baking time by 1-2 minutes. If you prefer a darker crust, simply bake the pizza for longer, but check it every 30 seconds after the recommended time to ensure it doesn’t burn.
Direct Thin-Crust Pizza Dough
Makes five 13-inch pizzas | Total Time: Active 15 minutes / Inactive 2 hours
INGREDIENTS
- 1-3/4 cups water, 70 F
- 1-3/4 tsp instant dry yeast
- 4-1/4 cups + 2 1/2 tbsp bread flour, 11.5%-12% protein
- 1/2 cup fine-ground cornmeal
- 2-1/4 tsp + 1/8 tsp salt
INSTRUCTIONS
- Combine the water and yeast in the mixer’s bowl and whisk to dissolve the yeast.
- Add the flour and cornmeal and mix on low speed to a shaggy mass, about 2 minutes.
- Mix on medium speed to low gluten development, about 3 minutes.
- Add the salt and mix on medium speed until the dough reaches full gluten development, about 5 minutes.
- Perform the windowpane test to assess gluten development. Take a portion of dough in your hands and stretch it: the more the dough can stretch without tearing, the more the gluten has developed. The dough will hold the window for at least 8-10 seconds and it can be stretched to the point that it is nearly see-through when it has reached full gluten development.
- Transfer the dough to a lightly floured worktable. Cover well with plastic wrap.
- Bench rest for 20 minutes.
- Divide the dough into five even-sized pieces.
- Place a square of dough in your dominant hand.
- Form a ring with the index finger and your thumb on the same hand.
- With your fingers from the opposite hand, push the dough through the ring. This should result in a smooth, tight ball. Make sure to pinch the seams shut well. Otherwise, the dough will tear when you shape it for baking, or it might cause a weak spot that will allow sauce and toppings to break through while baking.
- Repeat steps 9-11 with the four remaining pieces of dough.
- Place on a sheet pan. Spray a very light mist of water over the dough.
- Cover the dough well with plastic wrap.
- Proof the dough, covered, for 1-1/2 hours at 70 F.
- Test for proof using the fingertip test. Gently press the exposed surface of the dough for 2 seconds; the pressure should leave a small dent in the dough; it will slowly spring back, but the indentation should remain clearly visible after 1-2 seconds.
- Shape, assemble and bake the pizza according to the instructions in the recipe.
Notes
We recommend using Ceresota/Heckers Unbleached All-Purpose Flour for this dough. Note that they call their flour all-purpose, but the protein content places it in the bread flour category.
We typically use a dough hook to mix all our thin-crust pizza doughs. If the ingredient quantities aren’t large enough for the dough hook to mix them well in a stand mixer, use a paddle attachment initially to mix the ingredients uniformly. Once you have a homogeneous mass (the dough is sticky and wet, and there are no visible clumps or unincorporated water), switch to a hook attachment.
Final mix time at higher speeds may vary from machine to machine. Whatever the model and yield, the goal is to achieve a good mix and full gluten development. Consider our suggested times as guidelines only. Use the windowpane test to help determine the dough’s stage of gluten development.
After proofing at room temperature, you can roll the dough out and make the pizza. We recommend cold-proofing the dough for 1 day, however, because it produces a crispier thin-crust pizza. If you cold-proof the dough, remove it from refrigeration 1-1/2 to 2 hours before shaping so it warms up and is easier to stretch out.
Browned Onions
Makes about 1/3 cup + 2 tbsp
INGREDIENTS
- 3/4 cup-7/8 cup butter
- 4-1/3 cups yellow or white onions, thinly sliced
INSTRUCTIONS
- Melt the butter over medium-high heat in a saute pan that can easily accommodate all the onions.
- When the butter begins to bubble, add the onions and stir well to coat completely.
- Turn down the heat.
- Stir the onions so they cook evenly, about every 10 minutes.
- Once the onions have turned a deep brown and are soft, remove them from the heat. Cool to room temperature.
- Store them for 5 days in refrigeration.
Notes
The caramelizing process can take a long time, depending on the size of the batch. A small batch can take 30 minutes while a large batch can take over an hour or more. If you notice the onions are starting to char, add some water to the pot and continue to cook. If you refrigerate the onions, warm them up slightly before using.
This recipe appears courtesy of Modernist Pizza by Nathan Myhrvold and Francisco Migoya, published by The Cooking Lab.
Print this page